Theme Customization
This guide walks you through customizing your Shopify theme to use Particular Audience search, collection and recommendation blocks via the theme editor (customizer).
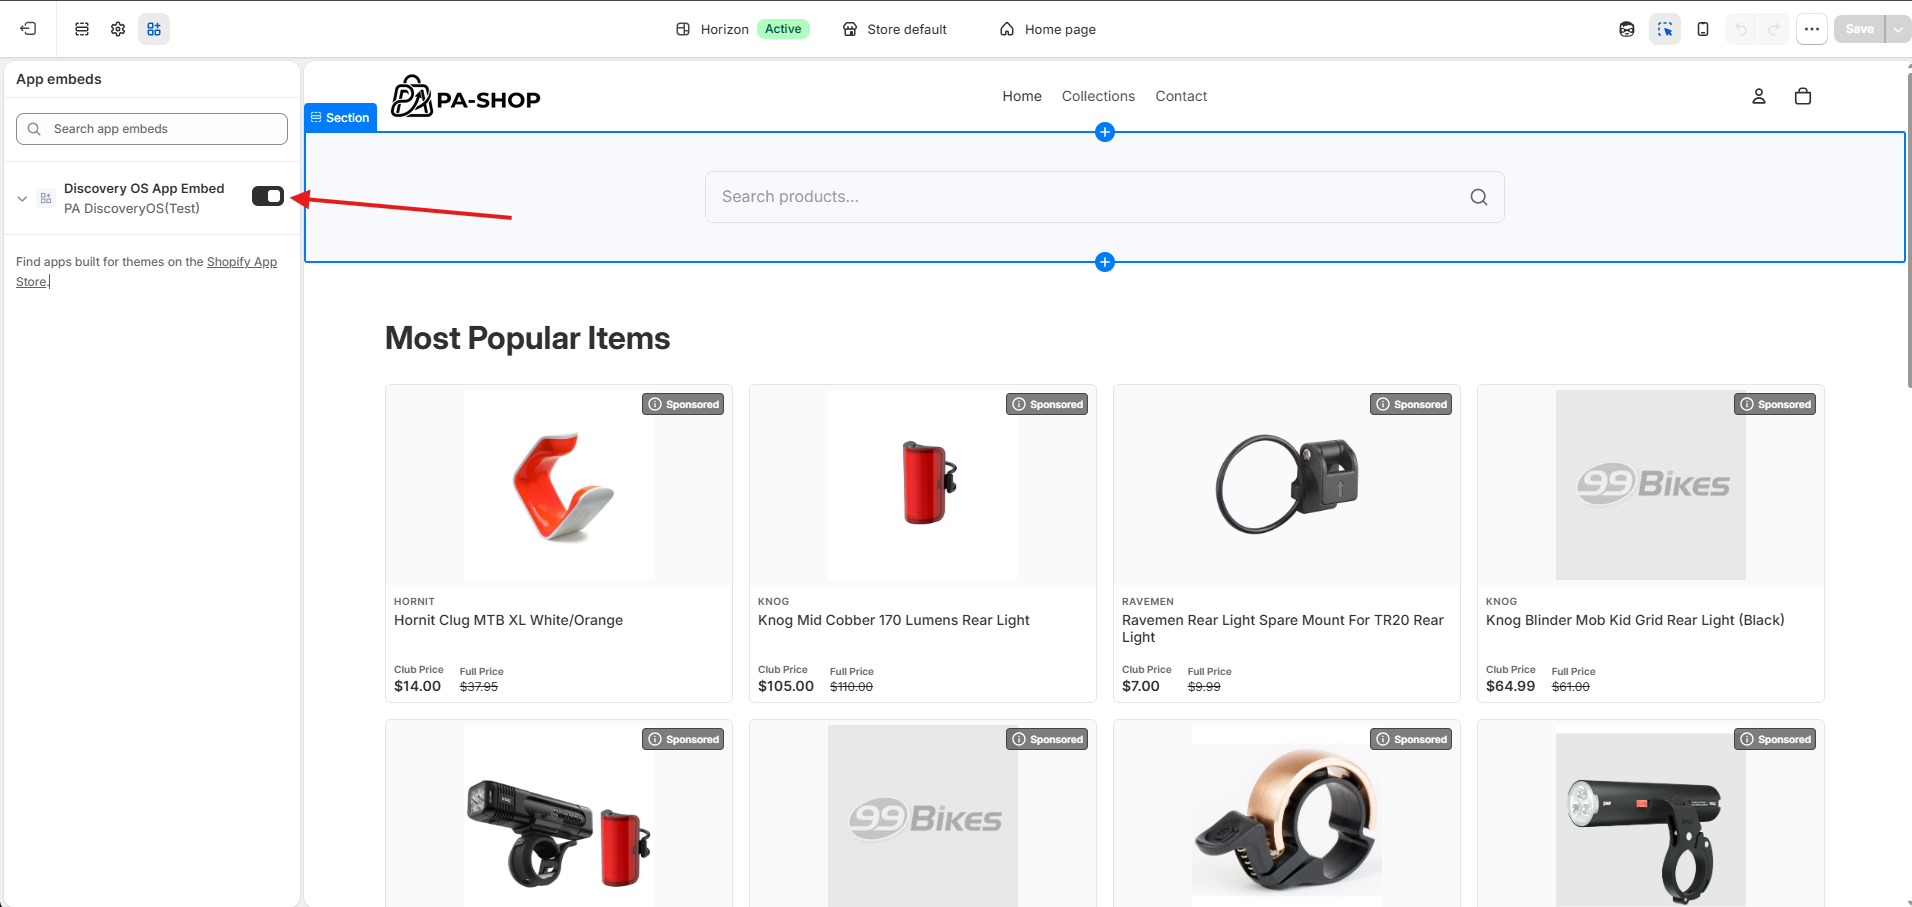
The core part: Enable app extension (embedded)
Enable the app’s embedded extension so its blocks are available in the theme editor.
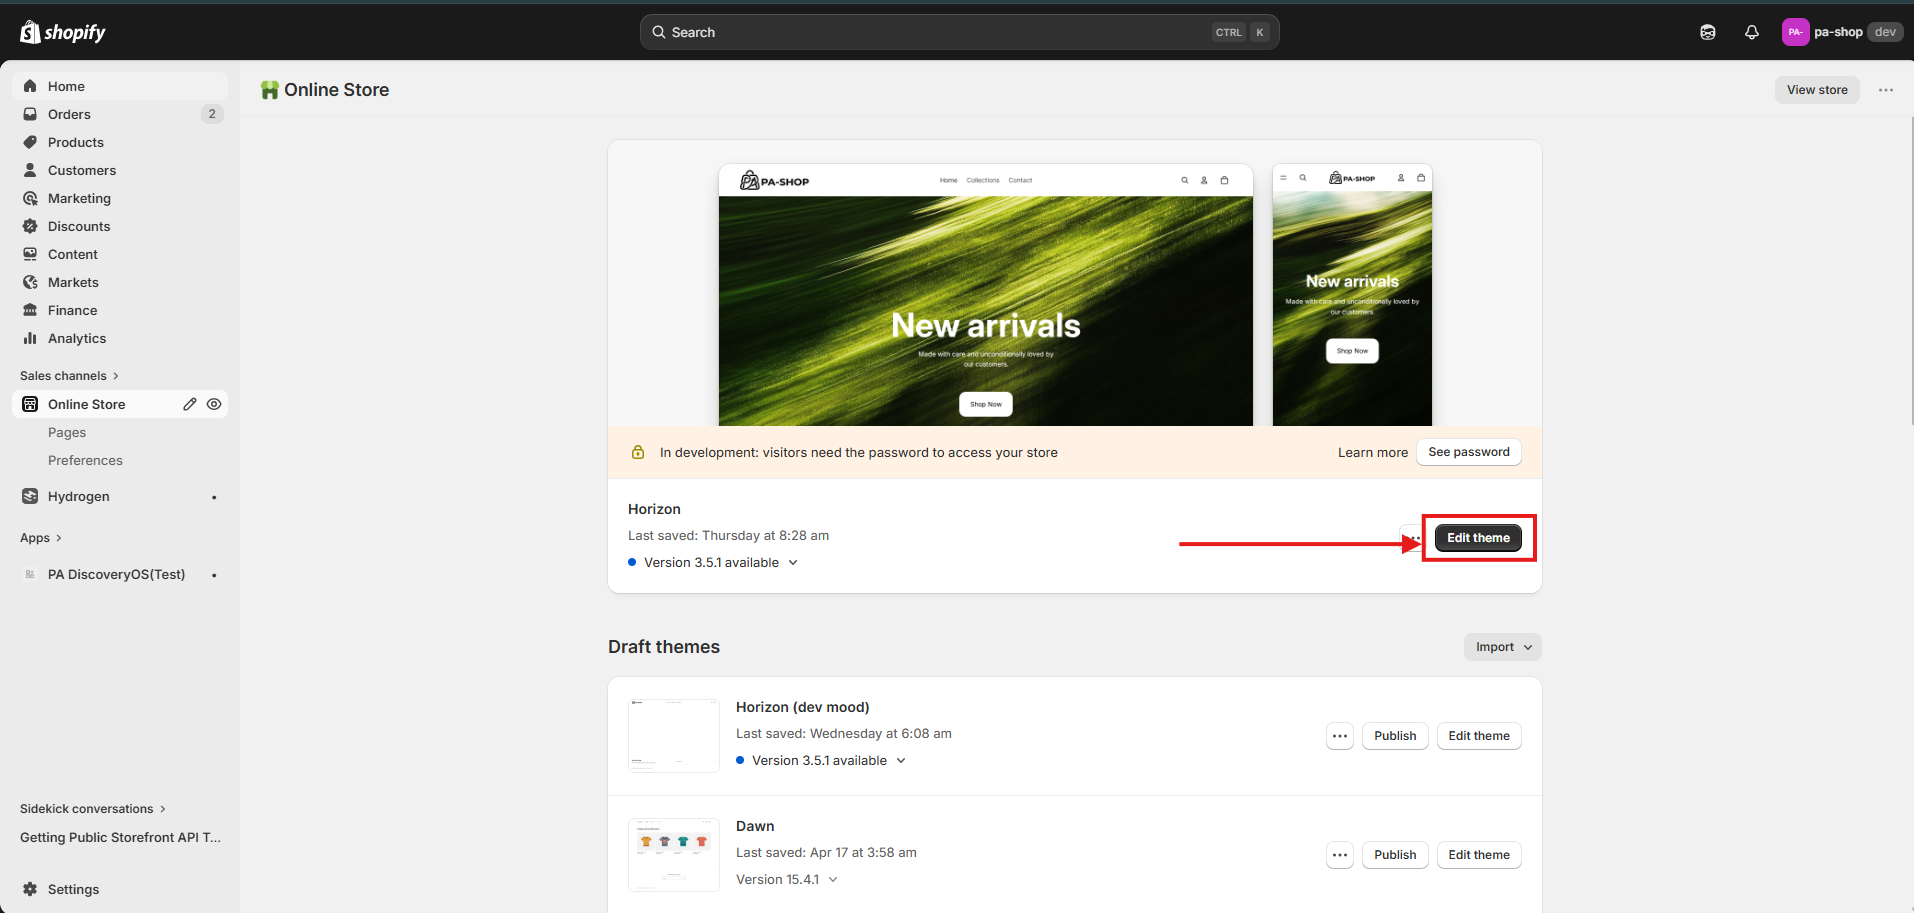
- In Shopify admin, go to Online Store > Themes.
- Click Edit Theme for your desired theme.
- Open App embeds (usually in the left sidebar or theme settings).
- Find the DiscoveryOs App Embed and turn on its checkbox.
- Save.
Adding Widgets
Select the widget that you want to show from the Add Block > Apps.
Make sure the related widgets are created and assigned to the correct routes in DiscoveryOS before you add them in the theme editor. A widget that does not match the page you place it on will not load.
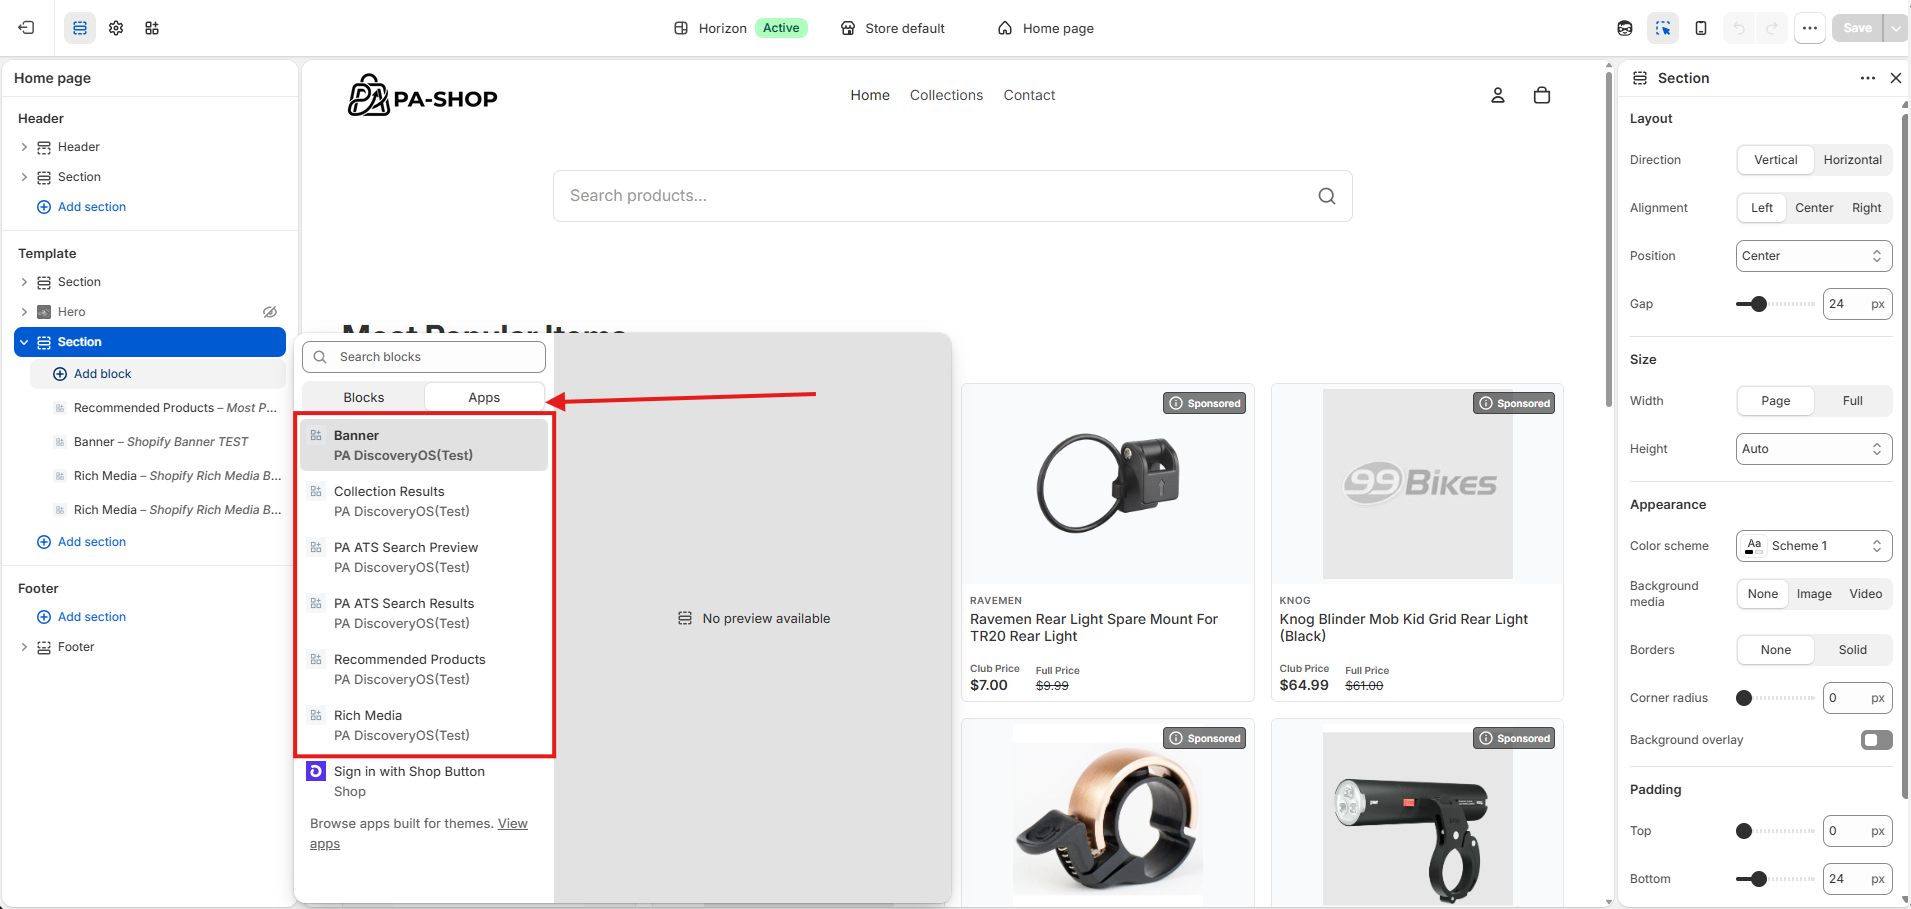
- In the theme editor, go to Edit theme (or the section where you want to add a block).
- Select Add Section (or the relevant section).
- Go to Apps tab and select a widget to add.
- Save.
PA ATS Search Preview
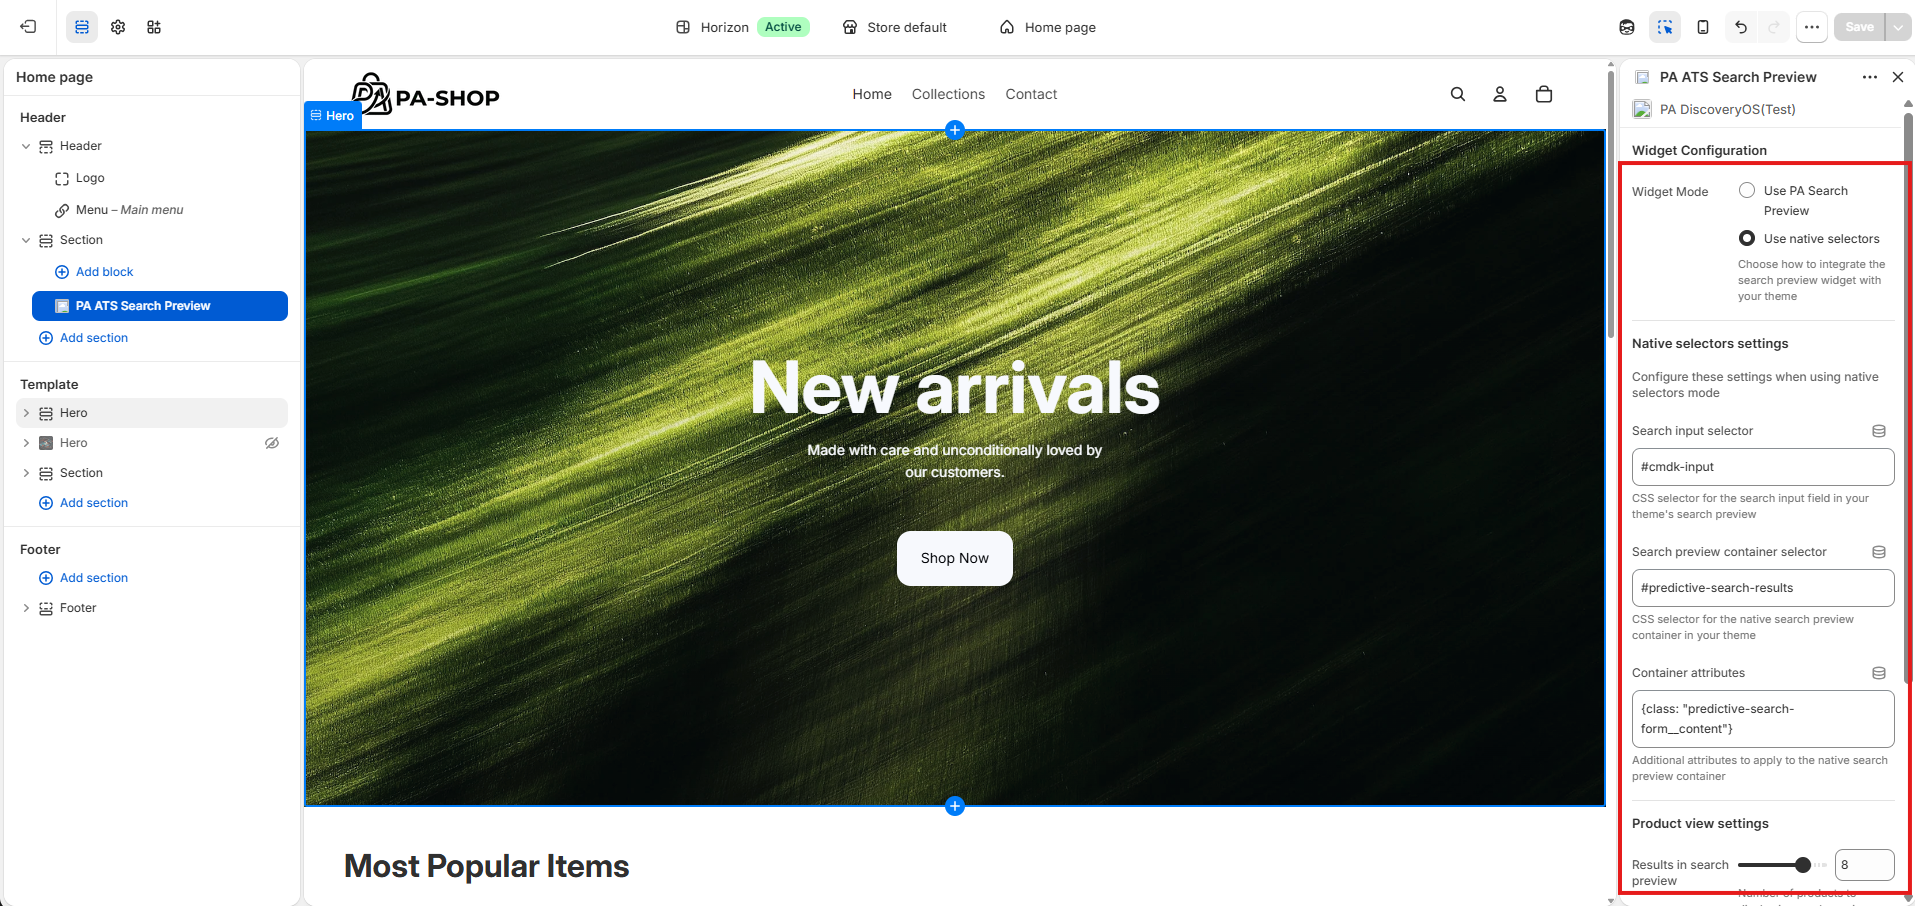
Configure how search-as-you-type (preview) works: either standalone (app-owned UI) or native (using your theme’s existing search elements).
Add the PA ATS Search Preview block
- In the theme editor, go to Header (or the section that contains your search).
- Add section if needed, then Add block.
- Add the ATS Search Preview block.
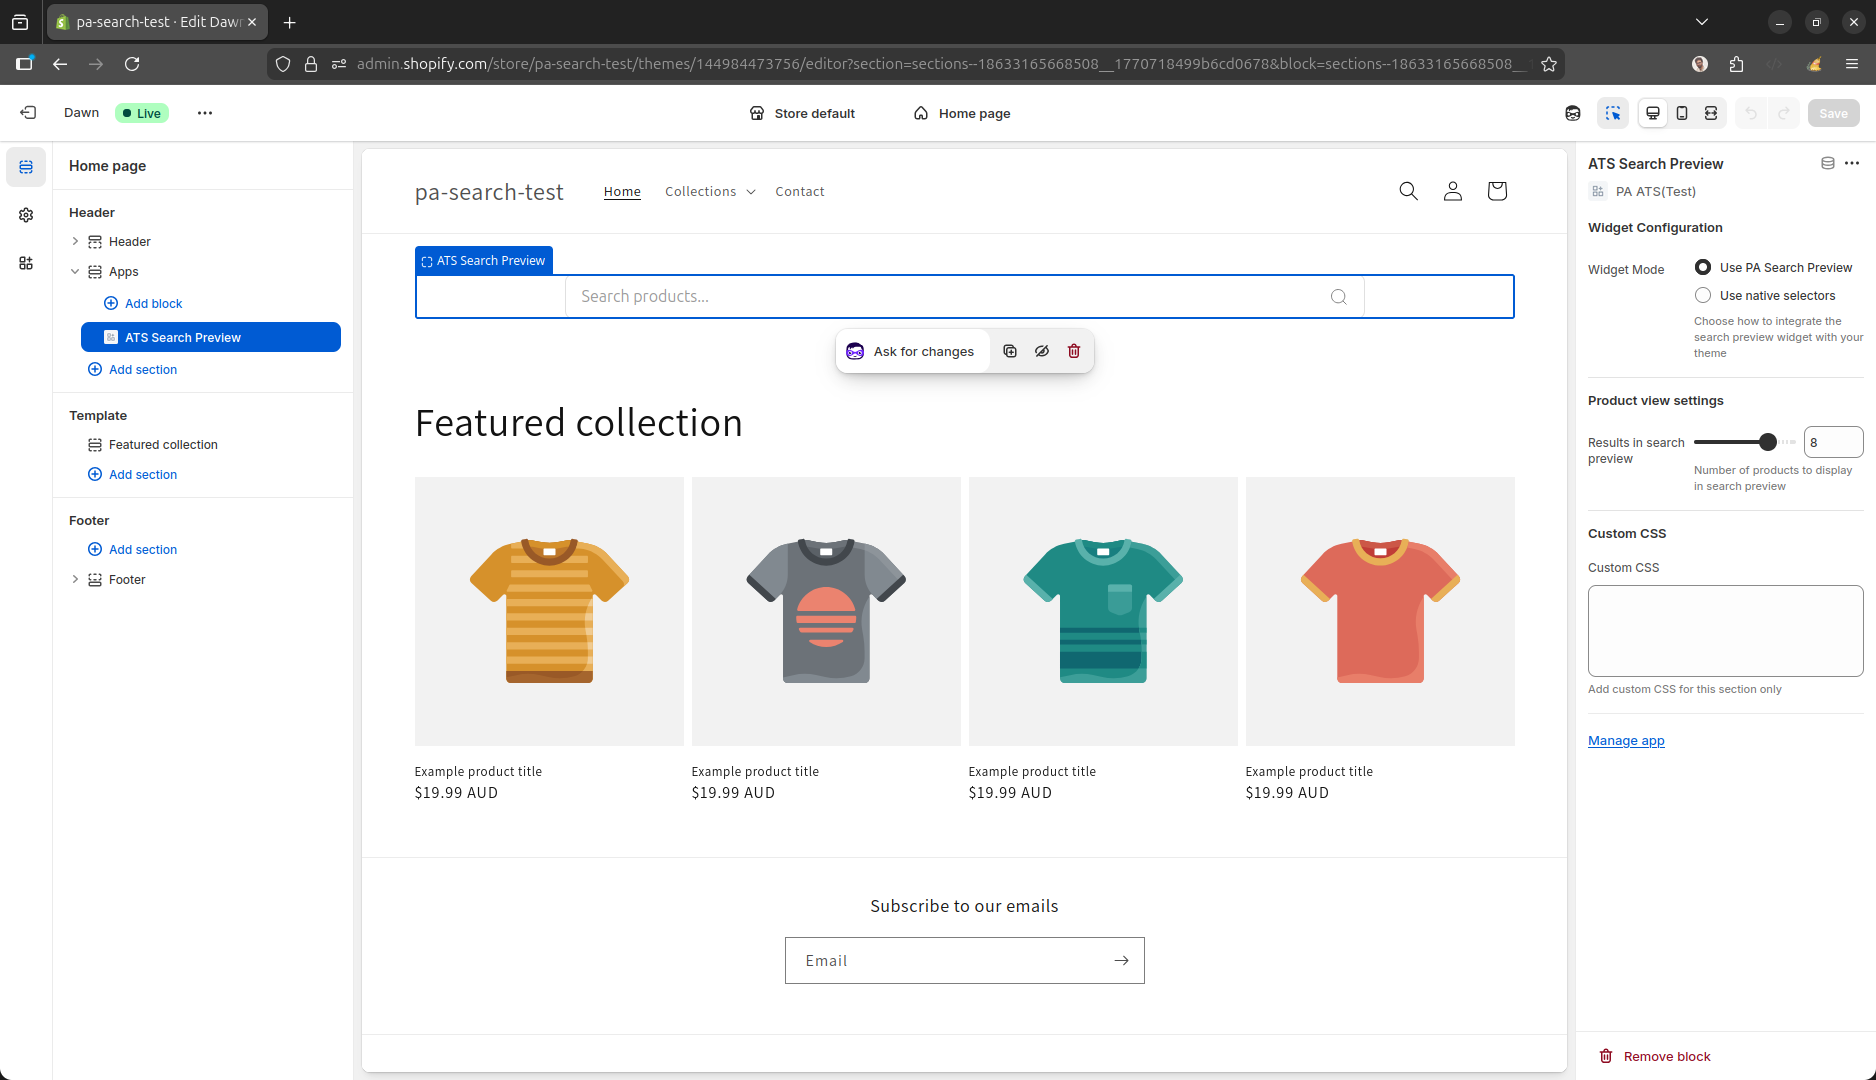
Choose mode: Standalone or Native
-
Standalone
The app renders its own search input and preview container. No selectors needed. -
Native
The app hooks into your theme’s existing search input and a container you specify. Use the settings below.
Native mode settings
If you selected Native, configure:
| Setting | Description | Example |
|---|---|---|
| Input selector | CSS selector for the theme’s search input. | #Search-In-Modal |
| Preview container | Selector for the element where results will be rendered. | form.search.search-modal__form |
| Container attributes | JSON of attributes required on the container for correct display. | {"tabindex":"-1","data-predictive-search":"","class": "predictive-search predictive-search--header"} |
| Product view settings | Number of products to show in the preview. | e.g. 5, 10 |
| Custom CSS | Optional CSS for styling the preview. | As needed |
Example for a native header search modal:
- Input selector:
#Search-In-Modal— the native search input field. - Preview container:
form.search.search-modal__form— where results will be populated. - Container attributes:
{"tabindex":"-1","data-predictive-search":"","class": "predictive-search predictive-search--header"}
(JSON for attributes required to display the element correctly.)
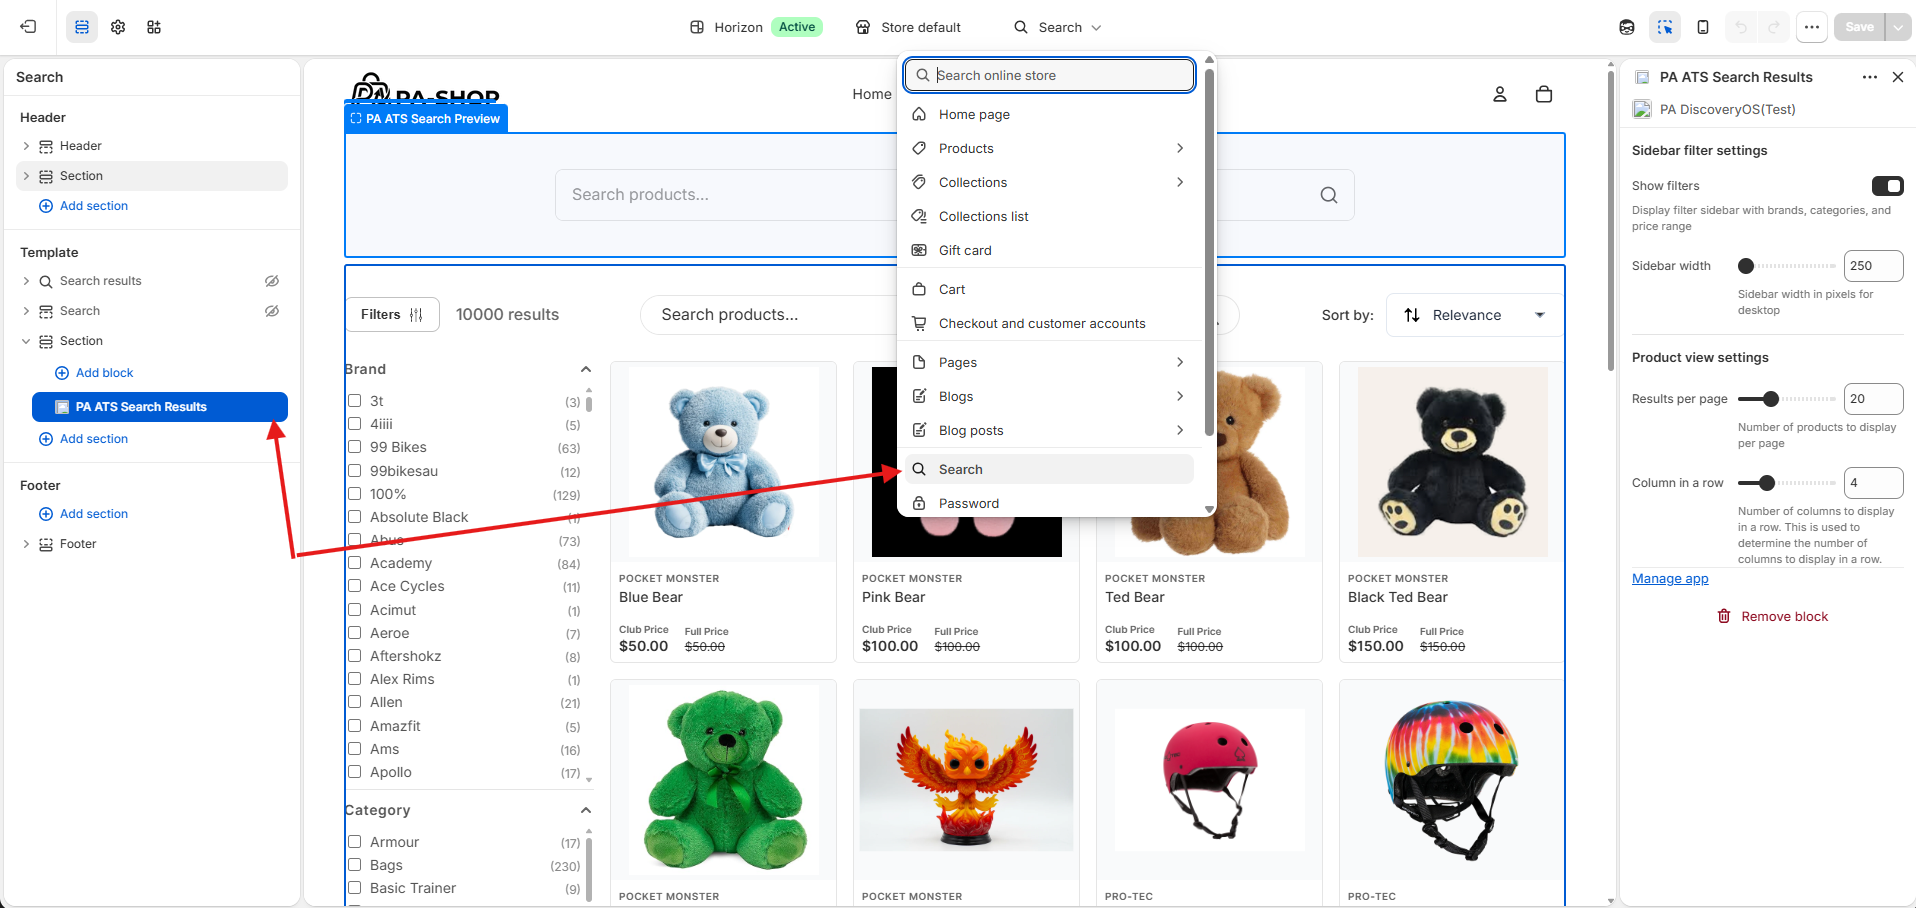
PA ATS Search Results
Configure the dedicated search results page.
- In the theme customizer, go to the Search page (or the template used for search).
- Inside that template, Add block and add the ATS Search Results block.
- Adjust settings (e.g. layout, number of results) if needed.
- Save.
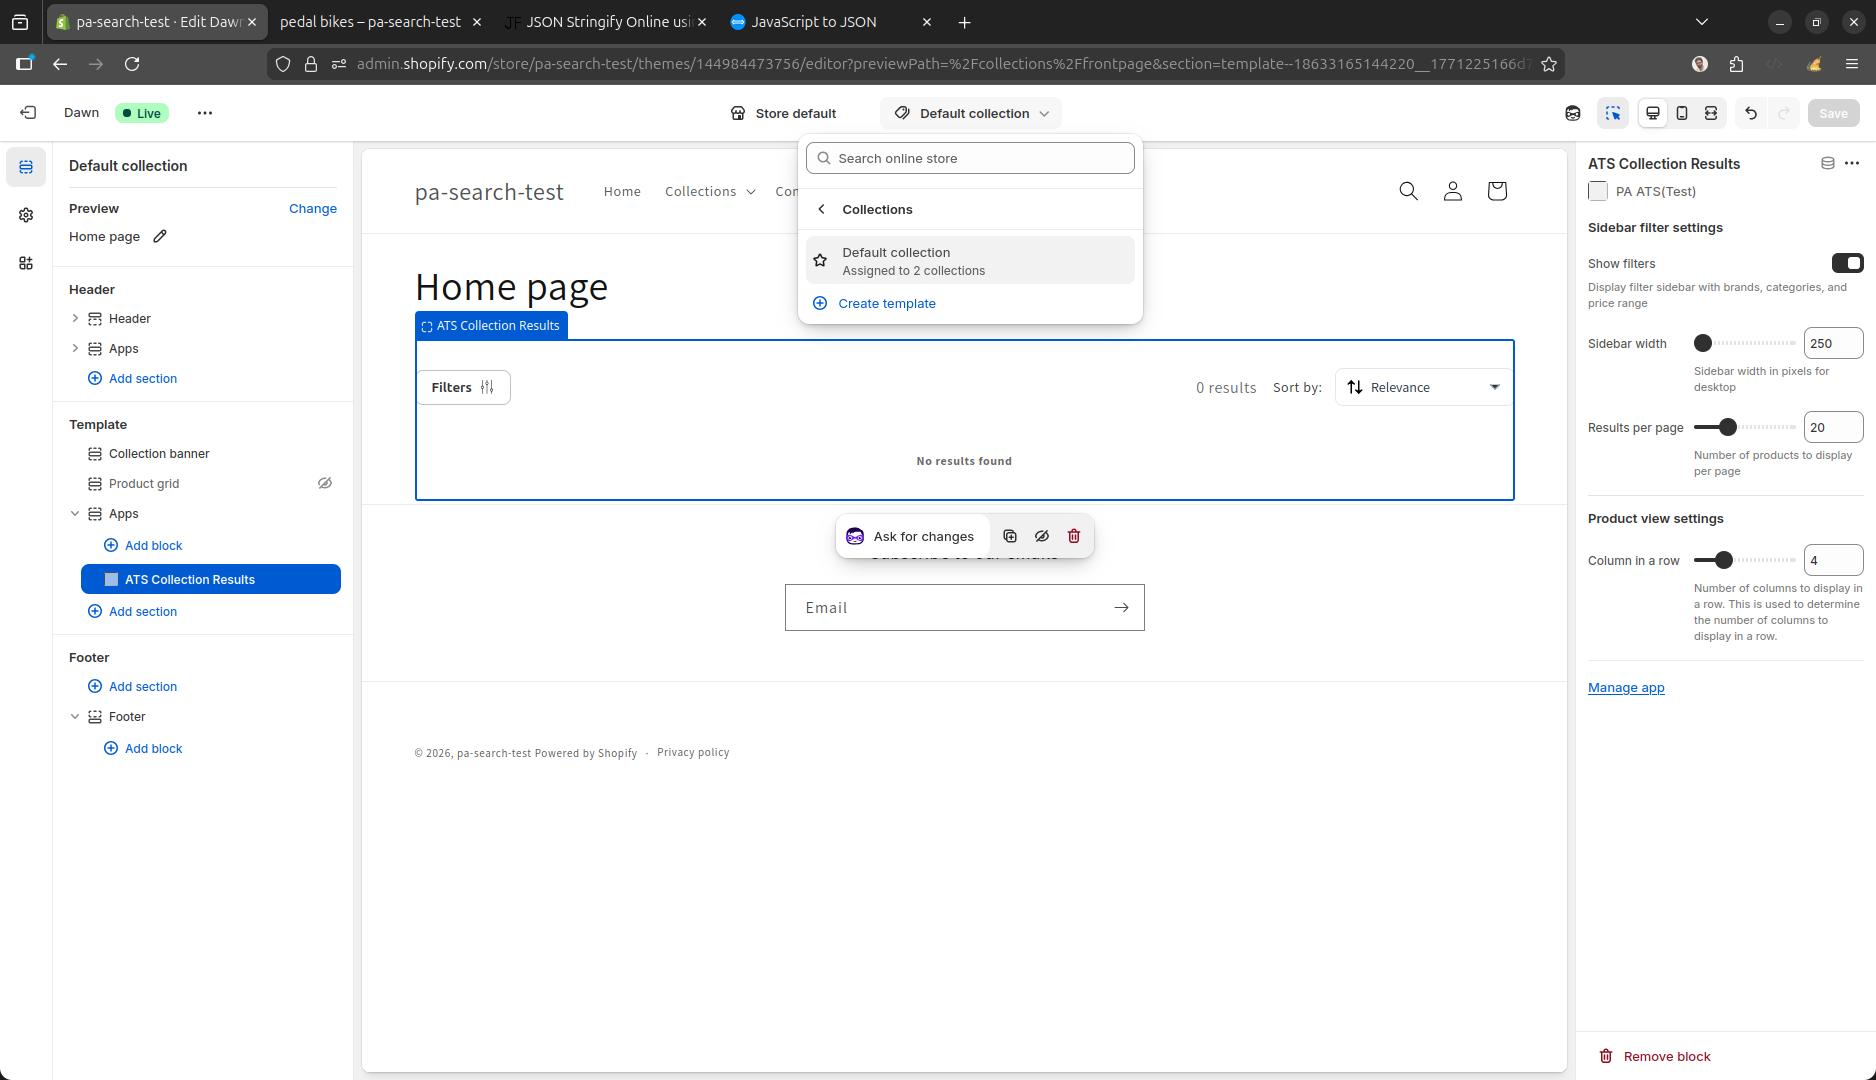
Collection Results
Configure how collection results appear on the default collection template.
- In the theme customizer, open the default collection page/template.
- Inside the template, Add block and add the ATS Collection Results block.
- Change settings (e.g. grid, pagination) if needed.
- Save.
Discovery OS widgets
Use the theme editor to place Discovery OS widgets (banner, recommendations, bundles, rich media) on your storefront. The same app embed as in Enable app extension (embedded) must stay enabled so scripts, styles, and widget lists load.
Make sure all widgets are synced from DiscoveryOS into Shopify before you add or configure widget blocks. Run Widget Sync whenever you create or change widgets in DiscoveryOS (banner, recommendation, rich media, and bundle).
Widget types
| Widget | Theme editor (Apps) | Notes |
|---|---|---|
| Banner | Banner | Merchandising-style banners (slider, grid, or teaser tile). |
| Recommendation | Recommended Products | Product recommendations (e.g. “Customers also bought”). |
| Bundle | Bundle Widget | Only on the product (PDP) template — Shopify restricts this block to product pages. |
| Rich media | Rich Media | Rich content as a banner-style layout or a recommendation-style carousel. |
Add and configure widget blocks
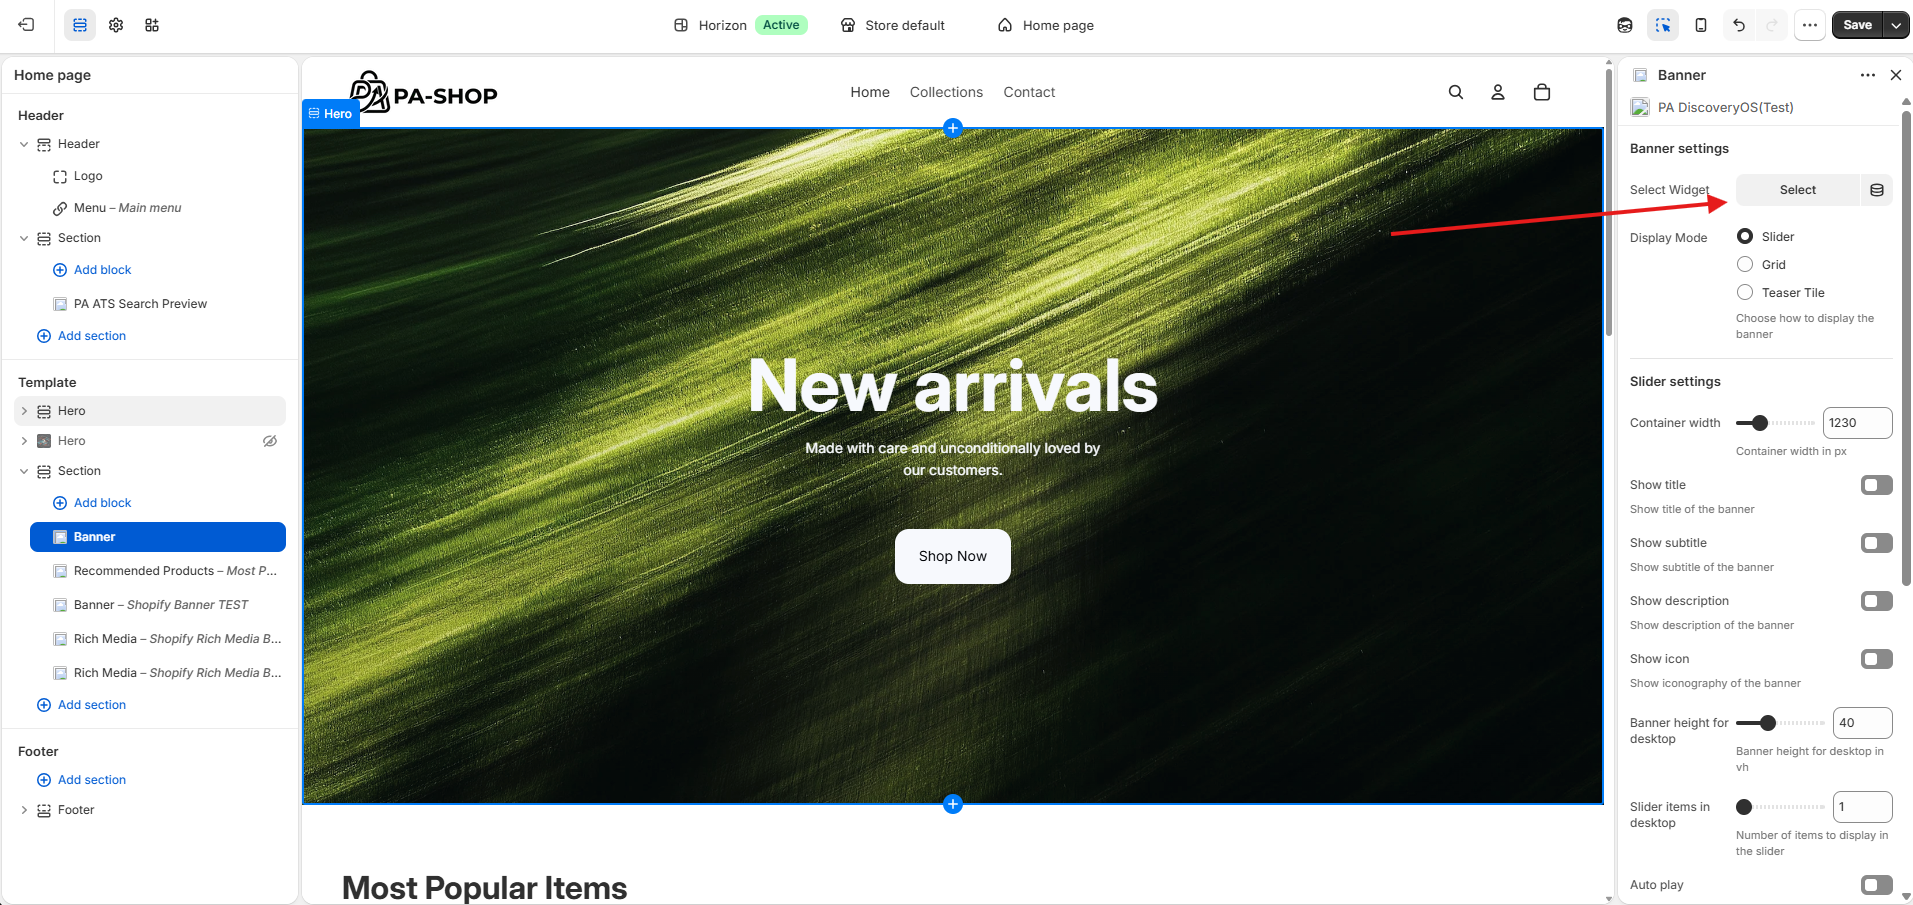
- In Online Store → Themes → Customize, open the template or section where you want the widget. Add block (or add a section that supports app blocks, then add a block). Under Apps, choose Banner, Bundle Widget, Rich Media, or Recommended Products.
- In the right-hand settings panel, open Select Widget and choose the widget from DiscoveryOS. This is required — without it, the storefront does not know which configuration to render.
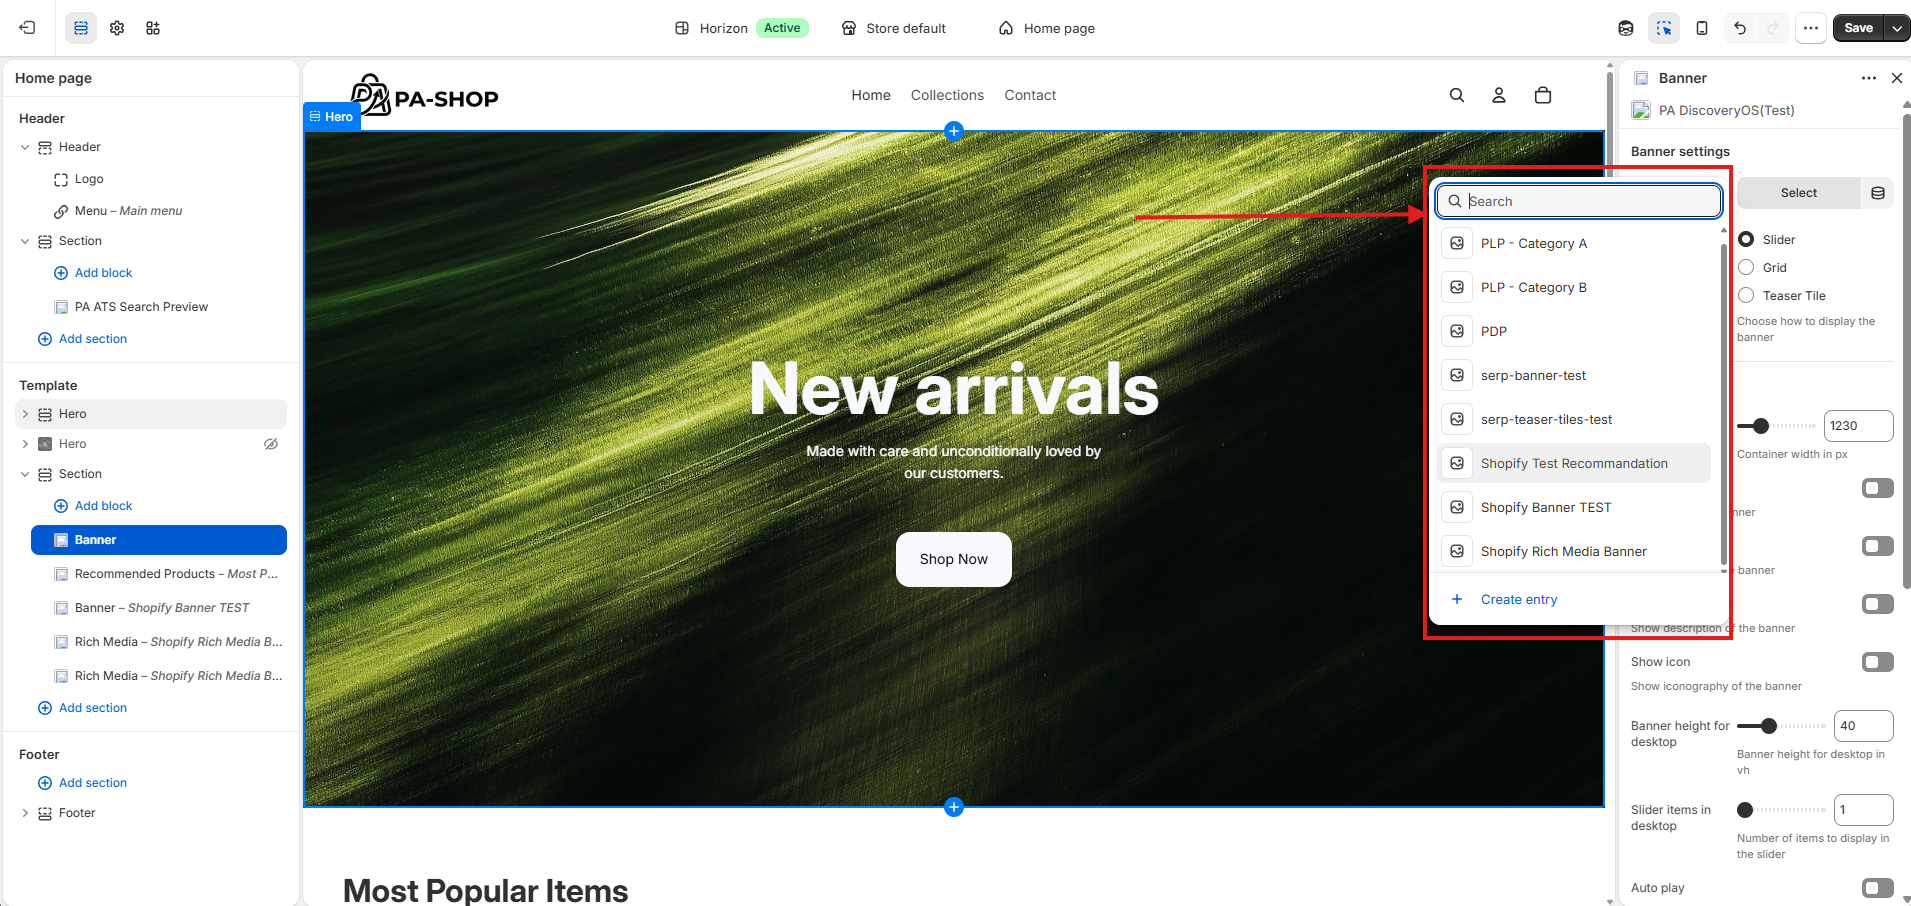
- Optional: adjust block settings for layout and UI (see below), then Save.
Banner (optional settings)
- Display mode: Slider, Grid, or Teaser tile
- Slider: container width; title / subtitle / description / icon toggles; desktop height (vh); items per view (desktop and mobile); auto-play and speed; navigation (arrows, dots, scroll)
- Grid: items per row, gap (px)
- Teaser tile: HTML selector, wrapper element/class, replace native HTML
- Custom CSS
Recommended Products (optional settings)
- Widget title
- Display mode: Slider or Grid
- Max items to display, gap (px)
- Slider: items (desktop/mobile), navigation (arrows, dots, scroll)
- Grid: items per row
- Custom CSS
Rich Media (optional settings)
- Display mode: As banner or As recommendation
- Slider: title / subtitle / description / icon toggles; when “As recommendation”: slider items (desktop/mobile), auto-play and speed, navigation (arrows, dots, scroll, arrows and dots)
- Custom CSS
Bundle Widget (optional settings)
- Title
- Max products to display (1–5)
- Button text (default: “Add bundle to cart”)
Troubleshooting widgets
- Missing data: Incomplete widget or content in DiscoveryOS may prevent the block from rendering.
- Route mismatch: Widget data is requested for the current page route. A widget built for the product list page (PLP) in DiscoveryOS will not load on the home page (or another non-matching route). Use a matching template or change targeting in DiscoveryOS.
- No slots: If the widget matches the route but has no slots, it will not load. Configure slots in DiscoveryOS, then sync again if needed.